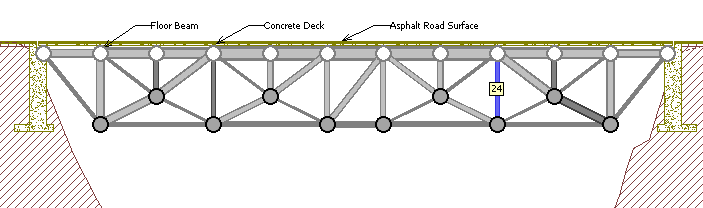
Wednesday, April 25, 2012

A2- Parker

1. The design goals for this particular bridge are to create a bridge that has the best price to weight  ratio. The bridge is a square shape with triangle reinforcements in order to create a design that is visually appealing and to allow for web members to be added in such a way that allows the load to be distributed evenly across the bridge.

2. Elevation View


3. Plan View


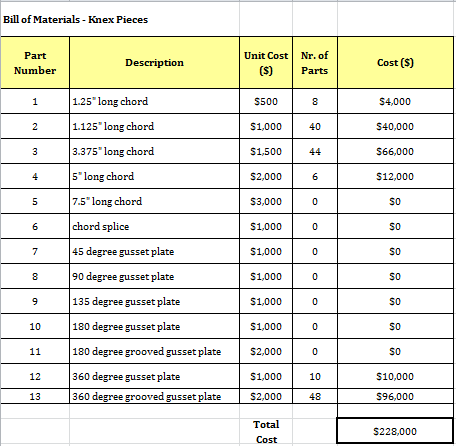
4. Truss Bill of Materials


5. The shape of the bridge was not changed much during the design, the hardest thing encountered was meeting the length requirement, many of the designs created were only 22" in length not the required 24". This led to problems when trying to find a design where the angles would work yet the length was sufficient. This design is certainly not the best work but without sitting in a lab and testing different designs there is no way take this bridge to the next level.

6. This assignment has shown that when working on designing something you need to have an image of what you want the design to look like going in so that you have something to work off of yet at the same time you need to keep an open mind in case problems arise. In this design problems arose that were unexpected such as trying to create a bridge that was long enough to span a 24" opening yet at the same time keeping in mind the fact that all connections must be made in increments of 45 degrees.

Week 4: KNEX vs WPBD


Last week we focused our efforts on working with West Point Bridge Designer to experiment with different designs and properties of bridges, prior to lab this week it was essential to have begun thinking about designs for our prototype bridges. This coming week we have agreed to draw our designs for bridge and to start thinking about what designs or design components we should implement into our team bridge in the coming weeks. This week we had not real major accomplishments, due to the fact that our time spent in the lab was spent testing our ideas with knex to enhance our understanding when we design our bridges. The group nor myself see any problems on the horizon.

The similarities between West Point Bridge Designer and Knex are that each piece has a price associated with it and each piece has a load that it can carry. Designs created in West Point Bridge Designer can theoretically be transferred and built using Knex, with only minor changes conforming to

The difference between the two systems is that in West Point Bridge Designer, the beams can be attached to the gusset plates at any angle whereas with KNEX we are limited to attaching beams to the gusset plates at 45 degree increments. Furthermore with Knex we only have one type of material that we have to choose from whereas in West Point Bridge Designer the material can be changed and with this the properties of the materials change. Another advantage to KNEX is the fact that they are something that we can hold and assemble allowing us the opportunity go get real life design experience, it is one thing to see a drawing of a bridge and manipulate it and it is a totally different thing to assemble a bridge and analyze the failure. In addition with KNEX the bridge is exposed to more environmental factors that have an impact on design than West Point Bridge Designer is capable of showing.

Tuesday, April 24, 2012

Week 3: WPBD

This last week in engineering the group sat down together to analyze our west point bridge design bridges.  The group decided to use the bridge I created as the lowest cost.  In the next weeks we will need to take truss designs from what we have learned and use them to create a KNEX truss system.  Our group was in the top 3 for the lowest bridge cost which is really good.  The entire group is focusing well on our goals and striving to do the best possible.  Hopefully we can put the same effort into the KNEX project.

West Point Bridge Design is a program that can be used by Civil Engineers to get a general idea of how truss systems work on bridges.  It is also user friendly for people who do not know anything about bridges.  The WPBD program does a good job at simulating the stress applied to a bridge by the dead load and a live load driving over it.  It is able to calculate accurate costs for a bridge and it helps the user to see the amount of force on individual members of a truss system.  The problem with WPBD is that it does not take any consideration into the trusses that run from side to side across the bridge.  This doesn't allow us to see how weight can affect the bridge from side to side or how wind would affect it.  Due to this WPBD is not very realistic when compared to real life bridges.

Week 3: West Point Bridge Design

In the past week we have been working on combining our bridge design ideas together to form the most cost-effective bridge possible, while still maintaining structural safety. While we basically now have our design, the next week or two will consist of the transition from the drawing board to the build. We will asuure that our design has no known flaws and is ready to be constructed.

The West Point Bridge Design program is a tool that can be used by civil engineers to assist in designing a bridge. Within the program are many realistic features that are crucial to the bridge building world, such as the cost breakdown of materials, strengths of different metals, and detailed load test results. While these are features are great, one thing that WPBD does not incorporate is horizontal force. A good example of external force is wind. Though a bridge may hold up with just force from the road, it may not be able to withstand the hurricane force winds that are possible in many areas of the world. This is a very important factor when designing a bridge in the real world. Overall, I would say that WPBD does a good job at designing the basics of a bridge, but it is not sufficient enough for a real world design.

Wednesday, April 18, 2012

Week 3: WPBD


Last week was spent working with West Point Bridge Designer to come up with the cheapest design for a bridge that met the constraints posted on the course website. This coming week we have agreed upon refining designs and to being the initial planning stages foe the KNEX bridge in the coming weeks. The biggest accomplishment that we had as a team was seeing that the bridges that Arron, Dan and I Designed were first, second, and third respectively in the class competition. I see no issues as an individual nor as a team.

West Point Bridge Designer is intended for Civil Engineers to get hands-on experience with bridge design. Real world design problems have many possible solutions to the problem, West Point Bridge Designer does not recognize all of the possible solutions as being correct. West Point Bridge Designer is realistic in the sense that it will not allow a bridge to span an opening that it cannot realistically span. West Point Bridge Designer is also realistic in the sense that  it incorporates the idea of trade-off, meaning that when you change you part of a design problems expectantly arise in a different part of the design. Safety is one of the most important aspect of any design, you can create a structure with the lowest cost to build but if you fail to design a structure that can safely transport what it was designed to West Point Bridge Designer will alert you to the problem. If this were applied to a real life design this simple aspect of the program could conceivable save lives. I think that the main majority of the aspects of West Point Bridge Designer are realistic but I feel if they were 100% realistic that the program would be too complex to understand and grasp, this leads me to believe that some aspects of the program are not realistic. One major component that is not realistic is the vertical displacement, this is exaggerated in West Point Bridge Designer to show that bridges do deflect when carrying a load. West Point Bridge Designer does not take into account horizontal forces such as wind either.

Tuesday, April 17, 2012

Week 2: Research Questions

In our week 2 lab, we brainstormed on different possiblities for out bridge design. We then began to familiarize ourselves with the West Point Bridge Design program and its features as we started designing our first couple bridges. At this point WPBD seems like en excellent program to learn about truss bridge characteristics and design. I find myself enjoying working with this program, and I hope to slowly tune in my bridge designing skilling using it. Before week 3's lab my teammates and I plan to have some bridge designs done for some team analysis to possibly better them. By doing this we hope to be able to combine some of out ideas into 1 final design.

Mr. Jay Bhatt,

1) Where could I find some examples of different truss bridge designs? I would be interested in studying some successful bridges and possibly taking some of their details into consideration when fine tuning my design.

2) What information is out there pertaining to different building materials and how they compare/contrast each other in the bridge building world?

3) Can I find out any information about former Drexel projects of this type? Id be interested to know what paths former students took in completeing their goals.

A1: Fitzpatrick


1)      Design Goals: The main goal of this design was to create an efficient yet cost effective truss bridge. I was able to do this by utilizing the maximum Compression/Tension to strength ratio possible. By doing this, I am assuring that my bridge design is as efficient as it can be. Though I experimented with bridge designs that featured trusses above the bridge deck, I found that my strongest and most cost effective bridge shown below features trusses below the bridge deck.

2)      Bridge Design:


3)       Truck Test in Middle of Bridge

4)  `Load Test Results


5)     Changes During Design:

            I found myself making many changes to my design as it progressed. The original design of this bridge was functional but very expensive. I proceeded to use materials of different types and sizes in order to slowly lower the price without lowering the quality or structural soundness of the design. 
6)    Cost of Bridge

             The final cost for this bridge has come out to be $227,520.51. I believe this is a satisfactory price tag for a bridge of this nature. If i were to be able to put some more time and effort into this design I believe I could lower the price a little more. By possibly altering the types of materials some more, I think I could get the cost of it to around $223,000.00

7) What I Have Learned

            Through using the WPBD program, I have learned a lot about how truss bridges behave under load. One critical thing that I found in my designs is that the locations of the joints is critical in a good bridge design. If any of these joints are inefficently placed, it can cause uneven load distribution in the bridge and make for a difficult time getting a structurely sound design.

Week 2 Library Questions

In week 2 the group discussed some ideas for bridge designs and that each member would design a bridge in WPBD. Hopefully using this program will give each member a better understanding of how truss systems work, and it should help to analyze how cost can be decreased for a bridge project. After completing these designs the group will look over each one and try to make a bridge that is better then all 3 of them using the information and ideas of the designs each member has created. The group will also be using any information they can find about bridge construction and materials to help decrease the cost of the bridge.

Mr. Jay Bhatt

1) Where can I find what kind of materials are strongest and the cheapest to use in the construction of a bridge? How bout what material is strongest against compression forces? Tension forces?

2) Where can I find out about arced truss systems and straight truss systems?

3) Where can I find what size pieces of a material are considered a common size?

Saturday, April 14, 2012

A1: Miller

Design Goal:
The West Point Bridge Design competition is about creating a sturdy bridge at the lowest cost. In the real world bridges need to be made safe but yet as cheap as possible to fit the budget. My goal was to build a bridge spanning a 24meter gap as cheaply as possible without it breaking during a load test. The load test simulates a truck driving across the bridge. In order to do this I will pick a series of trusses to support the bridge. Each individual part of a truss will be examined to see if it is stressed by tension or compression forces. A solid bar is stronger against tension forces and hollow tubes are stronger against compression forces. It is also important to try to make each piece as small as possible. This is able to be done by getting the force on each piece as close to one as possible. At one the piece will break.

2-D Drawing:

Truck Test in the Middle of the Bridge:
Load Test Results:
Changes to the Bridge During Design:
During the designing of the bridge several changes were made. I adjusted the sizes of each piece according the the forces acting on them. I also changed the center truss section. Originally I had a connection point in the center of the square at the middle with 4 small bars coming out from it to each corner. I found it was cheaper to replace this with 2 bars instead. I like to design the trusses on the bottom and I tried putting an "X" shape in the center of each square as the bracing. I found that a small vertical piece from the roadway to the center of the "X" helped tremendously with the support of the roadway.

Bridge Design Cost:
The bridge I designed costs $222,377.07. I believe this is a pretty good price for a bridge of this size. Some design changes in the truss system would possibly be able to lower this cost. I think it would be possible to design a bridge under $220,000 with additional time and truss analysis.

What I've Learned:
Using WPBD has allowed me to see how trusses can be analyzed and how different pieces are affected by the dead and live load the bridge bears. I learned that it is important to get a working bridge before I start to modify the sizes of braces and structural pieces. It is easy to increase the cost of the bridge. I found simple truss systems work well and are cost efficient. In another design I would like to try new building materials for pieces to see if I can use different materials to help lower the cost as well.

Week 2- Research Question


During week two of the course we discussed possible bridge designs, and used West Point Bridge Designer to start working on a design to understand the in’s and the outs of the programs and to determine what steps are needed to make the best possible design. Before week three of class we have decided that we will each work individually on a bridge design, consulting our team members if we need help. Although A1 in an individual assignment we are not opposed to helping our team members succeed because if we are successful at this stage when we move into the team design portion of the course we feel that we will be that much better. The only issues that we face at this time are individual issues of getting to know West Point Bridge Designer and creating the best possible bridge to submit.
Mr. Jay Bhatt.
I have some questions regarding research that needs to conduct about bridges to be successful in finding the strongest and cheapest design for a bridge.
  1. Where can I find information about different designs for truss bridges. Sub questions that come to mind that should be able to be answered under finding a comparison of designs are as follows: Is it better to have the deck of the bridge at the bottom of the truss, in the middle of the truss or on top of the truss? Does the shape of the truss matter (ie. X shape or just a single beam connecting 1 set of opposite corners in a /)? Is there a height to length ratio for the truss span that gives the most strength
  2.  Where would be the best place to start researching the cost of the materials that are needed to construct a bridge, specifically I want information related to the breaking strength of different metals and an overall comparison to determine the metal or material that has the highest strength and lowest cost. In addition are there materials that should be avoided or that would be detrimental to cost to strength of a bridge?
  3. What is the best place to start looking for tests of bridges and typical failure points, and ways to improve upon designs of bridges that are already tried and proven designs?

Wednesday, April 11, 2012

A1- Parker


  1. Design Goals: In this design my goal was to create a sturdy structure for the lowest possible cost, in order to do this I focused on getting the Compression Force/Strength and Tension Force/Strength ratios as close to 1 as possible. A ratio of one means that the beams used are the smallest and best possible bridge that can be constructed. My bridge has the trusses underneath the bridge deck because it is one of the more common designs that I have seen around. Through the design process I have also found this design to allow for the lowest possible build cost.
  2. Two Dimensional Drawing:
  3.  Truck in the Middle of the Bridge:
  4.  Load Test Results:
  5. How the Bridge Changed During Design:
    This bridge has come to shape as a result of many trials and errors to determine the best shape and most cost effective design for a truss bridge. My early designs had the deck on the bottom of the trusses, I found that this was harder to stabilize and led to the need for bigger beams thus increasing the price. I have also changed the method, at first I was using a square with either a single or double diagonal, I have since switched to creating a design that has an extra gusset plate in the middle of the rectangles which allows for 5 shorter beams to form triangles.
  6. Bridge Cost:
    The total cost for the bridge shown above is $233,758.78. I feel that I have gotten the cost down to the lowest level that is possible with this design. If I were to change my design, or if more time was allowed I feel that I could lower the bridge cost to the $220,000.00 range.
  7. What I Learned:
    From using West Point Bridge Designer, I have learned that changing the size of one member of a bridge can have effects on other areas of the bridge that you were not considering, this played a crucial role in my design. If you look in the chart some of the Strength ratios are low this is due to the fact that lowing the size of that member to increase the ratio had a severe negative impact. I also learned to keep all options open, do not just follow the templates and do not just start making a bridge that costs upward of a million dollars, there is an in between, once you are able to design a structure that works you are able to go in and modify the components to lower the overall cost.

Tuesday, April 10, 2012

Week 1: Teamwork


In Week 1 our newly formed bridge design group was given the opportunity to get together and meet each other. Our group of Ryan, Aaron, and I teamed up and began to set up our blog. I have known Ryan for a good amount of time, but Aaron I have just met. I believe that we will collaborate well though. These next few weeks will be a crucial time for brainstorming ideas if we want to be successful in this project. I plan on spending some quality thinking time on my own, as well as the brainstorming we will do together. I will have to do my best to make our outside of class meetings work, as I have an hour commute to campus every day. Though this is a small obstacle, it is nothing that cannot be overcome. We will utilize the resources of text messaging, telephone, email, Facebook, and/or an online web chat site such as Skype if need be to effectively communicate our progress and obstacles. I plan to use the West Point Bridge Design as a vital tool in designing an efficient bridge. I plan on becoming familiar with the program and designing multiple sketch bridges in order to learn some of the ins and outs of truss design. I will also be spending some time learning the blogger site. As of right now it’s still a little fuzzy on how everything works. Hopefully after collaborating with each other in week 2’s lab I will be comfortable with using it.

Dan    

Thursday, April 5, 2012

Week 1 engineering

This week for Engineering groups were put together and the professor gave everyone an overview for the project. Group 13 composed of Ryan, Dan, and I meet up in lab. I've spent sometime studying with Ryan before so I already know him some. I will have to get to know Dan during the next few weeks. During the next few weeks it'll be important for each of us to research on our own time about bridge designs and to come up with ideas to share with the group. Using the West Point Bridge Design should give the group some ideas on the type of design we want to go with for the weight test near the end of the term. I've used the program before so hopefully I can help the other members if they need help starting. We will each be downloading the program and making a few bridges. Hopefully by sharing these plans we will improve our methods of bridge design. Getting ready for week 2 I'll be looking into the West Point program and the different designs of truss bridges that might be a plan to start basing an early design on. Not sure what all I'm doing with posts since this is the first time I have ever done it. Till the end of the term hopefully I'll have a better idea of what I'm doing and be able to help out with that area a little better. Our group will definitely need to work out some meeting times out of lab. That has been difficult in my previous group experiences and it'd be great to avoid any of those issues.

Miller

Wednesday, April 4, 2012

Week 1: Teamwork


Week 1 of lab we were able to get the blog designed and functioning. This time was also for us to get to better know our group members. Going forward to next week I personally will work to enhance the blog and make it visually appealing and house all of the necessary information.  
After discussing Professor Mitchell’s site on teamwork with Aaron and Dan, and having worked with them individually on separated tasks I feel like we will be able to capitalize on one another’s strengths and weaknesses. The biggest challenge that our group faces is meeting up outside of lab time due to various conflicts, Dan is a commuter so he is not here on weeknights and Aaron and myself both leave campus Thursday due to our job commitments at home. In order to overcome this it might become vital for just two members to meet and communicate what was discussed with the other member, additional ways to solve this problem are web meetings via skype. Communication will be a vital aspect of this course, we need to commute ideas clearly and effectively in order to alleviate the problems of duplicating work and or missing work because no one was focused on it. Communication will come in a variety of forms the most common will be text message, however should images need to be communicated this will occur via email or a separate section of the blog where we are able to collaborate our ideas. Major decisions will be made by the group, however minor decisions should be made by the individual whose role in the group covers that task. Should a problem arise as we progress though the term we will firs try to work it out amongst ourselves, if this fails we will move to looking at Professor Mitchell’s site, if this unfortunately fails we will contact our project advisor for suggestions.