Showing posts with label Albert. Show all posts

Wednesday, April 25, 2012

A2- Parker

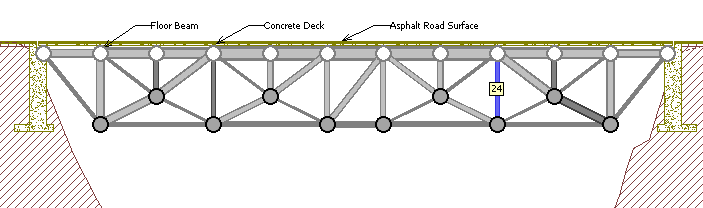
1. The design goals for this particular bridge are to create a bridge that has the best price to weight  ratio. The bridge is a square shape with triangle reinforcements in order to create a design that is visually appealing and to allow for web members to be added in such a way that allows the load to be distributed evenly across the bridge.

2. Elevation View


3. Plan View


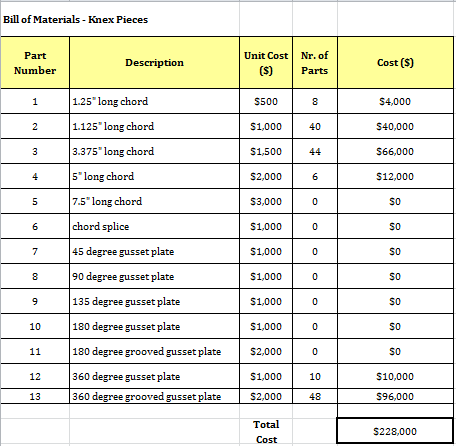
4. Truss Bill of Materials


5. The shape of the bridge was not changed much during the design, the hardest thing encountered was meeting the length requirement, many of the designs created were only 22" in length not the required 24". This led to problems when trying to find a design where the angles would work yet the length was sufficient. This design is certainly not the best work but without sitting in a lab and testing different designs there is no way take this bridge to the next level.

6. This assignment has shown that when working on designing something you need to have an image of what you want the design to look like going in so that you have something to work off of yet at the same time you need to keep an open mind in case problems arise. In this design problems arose that were unexpected such as trying to create a bridge that was long enough to span a 24" opening yet at the same time keeping in mind the fact that all connections must be made in increments of 45 degrees.

Wednesday, April 11, 2012

A1- Parker


  1. Design Goals: In this design my goal was to create a sturdy structure for the lowest possible cost, in order to do this I focused on getting the Compression Force/Strength and Tension Force/Strength ratios as close to 1 as possible. A ratio of one means that the beams used are the smallest and best possible bridge that can be constructed. My bridge has the trusses underneath the bridge deck because it is one of the more common designs that I have seen around. Through the design process I have also found this design to allow for the lowest possible build cost.
  2. Two Dimensional Drawing:
  3.  Truck in the Middle of the Bridge:
  4.  Load Test Results:
  5. How the Bridge Changed During Design:
    This bridge has come to shape as a result of many trials and errors to determine the best shape and most cost effective design for a truss bridge. My early designs had the deck on the bottom of the trusses, I found that this was harder to stabilize and led to the need for bigger beams thus increasing the price. I have also changed the method, at first I was using a square with either a single or double diagonal, I have since switched to creating a design that has an extra gusset plate in the middle of the rectangles which allows for 5 shorter beams to form triangles.
  6. Bridge Cost:
    The total cost for the bridge shown above is $233,758.78. I feel that I have gotten the cost down to the lowest level that is possible with this design. If I were to change my design, or if more time was allowed I feel that I could lower the bridge cost to the $220,000.00 range.
  7. What I Learned:
    From using West Point Bridge Designer, I have learned that changing the size of one member of a bridge can have effects on other areas of the bridge that you were not considering, this played a crucial role in my design. If you look in the chart some of the Strength ratios are low this is due to the fact that lowing the size of that member to increase the ratio had a severe negative impact. I also learned to keep all options open, do not just follow the templates and do not just start making a bridge that costs upward of a million dollars, there is an in between, once you are able to design a structure that works you are able to go in and modify the components to lower the overall cost.

Wednesday, April 4, 2012

Week 1: Teamwork


Week 1 of lab we were able to get the blog designed and functioning. This time was also for us to get to better know our group members. Going forward to next week I personally will work to enhance the blog and make it visually appealing and house all of the necessary information.  
After discussing Professor Mitchell’s site on teamwork with Aaron and Dan, and having worked with them individually on separated tasks I feel like we will be able to capitalize on one another’s strengths and weaknesses. The biggest challenge that our group faces is meeting up outside of lab time due to various conflicts, Dan is a commuter so he is not here on weeknights and Aaron and myself both leave campus Thursday due to our job commitments at home. In order to overcome this it might become vital for just two members to meet and communicate what was discussed with the other member, additional ways to solve this problem are web meetings via skype. Communication will be a vital aspect of this course, we need to commute ideas clearly and effectively in order to alleviate the problems of duplicating work and or missing work because no one was focused on it. Communication will come in a variety of forms the most common will be text message, however should images need to be communicated this will occur via email or a separate section of the blog where we are able to collaborate our ideas. Major decisions will be made by the group, however minor decisions should be made by the individual whose role in the group covers that task. Should a problem arise as we progress though the term we will firs try to work it out amongst ourselves, if this fails we will move to looking at Professor Mitchell’s site, if this unfortunately fails we will contact our project advisor for suggestions.